範例應用程式
我們將建立一個簡單的 twitter 網站。範例的原始程式碼可以在 examples/twitter 目錄中找到。您也可以在 github 上瀏覽原始程式碼。如果您更喜歡部落格應用程式,這裡還有一個範例部落格應用程式,但本指南不涵蓋它。
此範例應用程式使用 flask 網頁框架,這個框架非常容易上手。如果您還沒有 flask,您需要安裝它才能執行範例
pip install flask
執行範例

確定已安裝 flask 後,使用 cd 指令進入 twitter 範例目錄,然後執行 run_example.py 腳本
python run_example.py
此範例應用程式可以透過 https://127.0.0.1:5000/ 存取
深入程式碼
為了簡單起見,所有範例程式碼都包含在一個單一模組 examples/twitter/app.py 中。如需關於使用 peewee 構建較大型 Flask 應用程式的指南,請查看構建 Flask 應用程式。
模型
本著流行的網頁框架 Django 的精神,peewee 使用宣告式模型定義。如果您不熟悉 Django,概念是您為每個表格宣告一個模型類別。然後,模型類別會定義一個或多個欄位屬性,這些屬性對應於表格的欄位。對於 twitter 克隆,只有三個模型
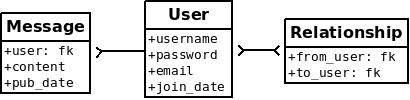
- 使用者:
代表使用者帳戶並儲存使用者名稱和密碼、用於使用 gravatar 產生頭像的電子郵件地址,以及表示建立該帳戶時間的日期時間欄位。
- 關係:
這是一個實用模型,其中包含 User 模型的兩個外部索引鍵,並儲存哪些使用者彼此追蹤。
- 訊息:
類似於推文。訊息模型會儲存推文的文字內容、建立時間和發文者 (使用者外部索引鍵)。
如果您喜歡 UML,這些是表格和關聯
為了建立這些模型,我們需要建立一個 SqliteDatabase 物件的實例。然後,我們定義模型類別,並將欄位指定為類別上的 Field 實例。
# create a peewee database instance -- our models will use this database to
# persist information
database = SqliteDatabase(DATABASE)

# model definitions -- the standard "pattern" is to define a base model class
# that specifies which database to use.  then, any subclasses will automatically
# use the correct storage.
class BaseModel(Model):
    class Meta:
        database = database

# the user model specifies its fields (or columns) declaratively, like django
class User(BaseModel):
    username = CharField(unique=True)
    password = CharField()
    email = CharField()
    join_date = DateTimeField()

# this model contains two foreign keys to user -- it essentially allows us to
# model a "many-to-many" relationship between users.  by querying and joining
# on different columns we can expose who a user is "related to" and who is
# "related to" a given user
class Relationship(BaseModel):
    from_user = ForeignKeyField(User, backref='relationships')
    to_user = ForeignKeyField(User, backref='related_to')

    class Meta:
        # `indexes` is a tuple of 2-tuples, where the 2-tuples are
        # a tuple of column names to index and a boolean indicating
        # whether the index is unique or not.
        indexes = (
            # Specify a unique multi-column index on from/to-user.
            (('from_user', 'to_user'), True),
        )

# a dead simple one-to-many relationship: one user has 0..n messages, exposed by
# the foreign key. a users messages will be accessible as a special attribute,
# User.messages.
class Message(BaseModel):
    user = ForeignKeyField(User, backref='messages')
    content = TextField()
    pub_date = DateTimeField()
注意
請注意,我們建立了一個 BaseModel 類別,該類別只會定義我們想要使用的資料庫。然後,所有其他模型都會擴充此類別,並且也會使用正確的資料庫連線。
Peewee 支援許多不同的 欄位類型,這些類型會對應到資料庫引擎普遍支援的不同欄位類型。Python 類型與資料庫中使用的類型之間的轉換是以透明的方式處理的,讓您可以在應用程式中使用下列內容
字串 (unicode 或其他)
整數、浮點數和
Decimal數字。布林值
日期、時間和日期時間
None(NULL)二進位資料
建立表格
為了開始使用模型,有必要建立表格。這是一次性的操作,可以使用互動式解譯器快速完成。我們可以建立一個小型輔助函式來完成此操作
def create_tables():
    with database:
        database.create_tables([User, Relationship, Message])
在範例應用程式旁邊的目錄中開啟一個 python shell,並執行以下內容
>>> from app import *
>>> create_tables()
注意
如果您遇到 ImportError,表示找不到 flask 或 peewee,而且可能未正確安裝。請查看安裝與測試文件,以取得有關安裝 peewee 的說明。
每個模型都有一個 create_table() 類別方法,該方法會在資料庫中執行 SQL CREATE TABLE 陳述式。此方法會建立表格,包括所有欄位、外部索引鍵條件約束、索引和序列。通常,這是在新增新模型時才會執行一次的操作。
Peewee 提供了一個輔助方法 Database.create_tables(),此方法會解析模型之間的相依性,並在每個模型上呼叫 create_table(),以確保表格依序建立。
建立資料庫連線
您可能已在上述模型程式碼中注意到,在基礎模型上定義了一個名為 Meta 的類別,該類別會設定 database 屬性。Peewee 允許每個模型指定其使用的資料庫。您可以指定許多 Meta 選項,以控制模型的行為。
這是一個 peewee 慣用方法
DATABASE = 'tweepee.db'

# Create a database instance that will manage the connection and
# execute queries
database = SqliteDatabase(DATABASE)

# Create a base-class all our models will inherit, which defines
# the database we'll be using.
class BaseModel(Model):
    class Meta:
        database = database
在開發網頁應用程式時,常見的做法是在請求開始時開啟連線,並在傳回回應時關閉連線。您應一律明確管理連線。例如,如果您使用連線集區,則只有在您呼叫 connect() 和 close() 時,連線才會正確回收。
我們將告訴 flask,在請求/回應週期中,我們需要建立與資料庫的連線。Flask 提供了一些方便的裝飾器來讓此操作變得輕而易舉
@app.before_request
def before_request():
    database.connect()

@app.after_request
def after_request(response):
    database.close()
    return response
注意
Peewee 使用執行緒本機儲存來管理連線狀態,因此此模式可以搭配多執行緒 WSGI 伺服器使用。
執行查詢
在 User 模型中,有一些實例方法封裝了一些使用者特定功能
following():此使用者正在追蹤誰?followers():誰正在追蹤此使用者?
這些方法的實作方式類似,但在 SQL JOIN 和 WHERE 子句中存在重要差異
def following(self):
    # query other users through the "relationship" table
    return (User
            .select()
            .join(Relationship, on=Relationship.to_user)
            .where(Relationship.from_user == self)
            .order_by(User.username))

def followers(self):
    return (User
            .select()
            .join(Relationship, on=Relationship.from_user)
            .where(Relationship.to_user == self)
            .order_by(User.username))
建立新物件
當新使用者想要加入網站時,我們需要確定使用者名稱可用,如果可用,則建立新的 User 記錄。查看 join() 檢視,我們可以發現我們的應用程式嘗試使用 Model.create() 來建立使用者。我們使用唯一條件約束定義了 User.username 欄位,因此如果使用者名稱已被使用,則資料庫會引發 IntegrityError。
try:
    with database.atomic():
        # Attempt to create the user. If the username is taken, due to the
        # unique constraint, the database will raise an IntegrityError.
        user = User.create(
            username=request.form['username'],
            password=md5(request.form['password']).hexdigest(),
            email=request.form['email'],
            join_date=datetime.datetime.now())

    # mark the user as being 'authenticated' by setting the session vars
    auth_user(user)
    return redirect(url_for('homepage'))

except IntegrityError:
    flash('That username is already taken')
當使用者想要追蹤某人時,我們將使用類似的方法。為了指出追蹤關係,我們在 Relationship 表格中建立一個從一個使用者指向另一個使用者的列。由於 from_user 和 to_user 上有唯一索引,因此我們將確定不會產生重複的列
user = get_object_or_404(User, username=username)
try:
    with database.atomic():
        Relationship.create(
            from_user=get_current_user(),
            to_user=user)
except IntegrityError:
    pass
執行子查詢
如果您已登入並瀏覽 twitter 首頁,您會看到您追蹤的使用者所發佈的推文。為了清楚地實作此功能,我們可以使用子查詢
注意
子查詢 user.following() 預設會選取 User 模型上的所有欄位。因為我們將其用作子查詢,所以 peewee 只會選取主索引鍵。
# python code
user = get_current_user()
messages = (Message
            .select()
            .where(Message.user.in_(user.following()))
            .order_by(Message.pub_date.desc()))
此程式碼對應於下列 SQL 查詢
SELECT t1."id", t1."user_id", t1."content", t1."pub_date"
FROM "message" AS t1
WHERE t1."user_id" IN (
    SELECT t2."id"
    FROM "user" AS t2
    INNER JOIN "relationship" AS t3
        ON t2."id" = t3."to_user_id"
    WHERE t3."from_user_id" = ?
)
其他感興趣的主題
範例應用程式中還有一些其他值得簡要提及的有趣內容。
對結果清單進行分頁的支援是在一個名為
object_list的簡單函式中實作 (繼承自 Django 中的相應函式)。此函式由傳回物件清單的所有檢視使用。def object_list(template_name, qr, var_name='object_list', **kwargs): kwargs.update( page=int(request.args.get('page', 1)), pages=qr.count() / 20 + 1) kwargs[var_name] = qr.paginate(kwargs['page']) return render_template(template_name, **kwargs)
具有
login_required裝飾器的簡單驗證系統。第一個函式只會在使用者成功登入時將使用者資料新增至目前的會話中。裝飾器login_required可用於包裝檢視函式,檢查會話是否已通過驗證,如果未通過驗證,則會重新導向至登入頁面。def auth_user(user): session['logged_in'] = True session['user'] = user session['username'] = user.username flash('You are logged in as %s' % (user.username)) def login_required(f): @wraps(f) def inner(*args, **kwargs): if not session.get('logged_in'): return redirect(url_for('login')) return f(*args, **kwargs) return inner
當在資料庫中找不到物件時,傳回 404 回應,而不是擲回例外狀況。
def get_object_or_404(model, *expressions):
    try:
        return model.get(*expressions)
    except model.DoesNotExist:
        abort(404)
注意
為了避免頻繁複製/貼上 object_list() 或 get_object_or_404(),這些函式會包含在 playhouse flask 擴充模組中。
from playhouse.flask_utils import get_object_or_404, object_list
更多範例
在 peewee 範例目錄中包含更多範例,包括
注意
喜歡這些程式碼片段並想了解更多嗎?請查看 flask-peewee - 這是一個 flask 外掛程式,為您的 peewee 模型提供類似 django 的管理介面、RESTful API、身份驗證等功能。